I started this mini project about a month ago to get familiar with the rise of AI agent tools we are currently seeing overtake not only all tech news outlets, but also all over social media. Everyone is trying to sell you the architecture they created in tools like n8n. But why buy when you can create your own?
Increasingly trends are showing that the workforce that exists today will need to learn how to augment their work with AI tools.
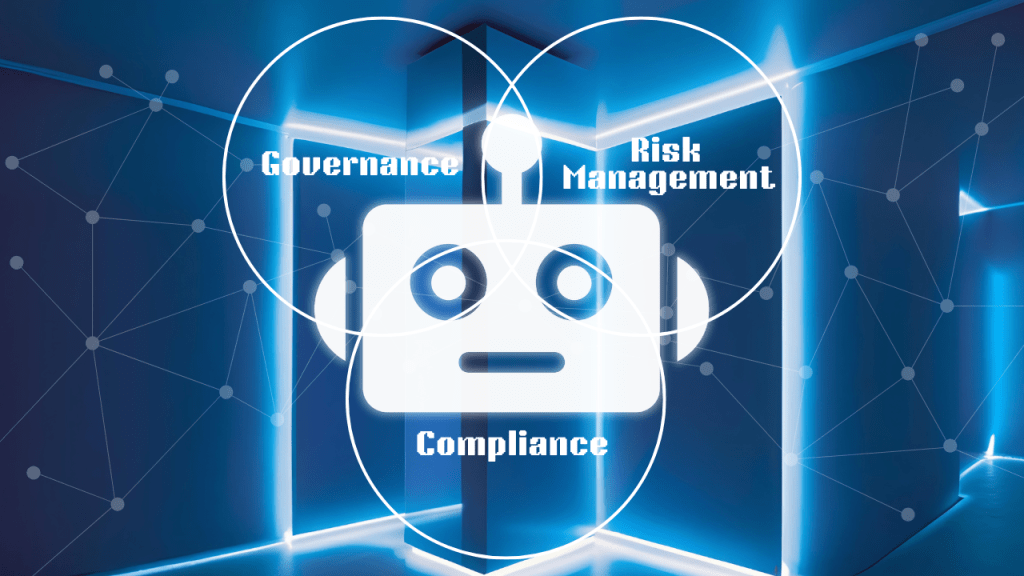
Because I’m eager to deepen my understanding of governance, risk, and compliance (GRC), I wanted to explore how the field is evolving. I thought it’d be best for me to learn what the future will look like for this role. Therefore, I give you my GRC AI Tool.
Below are the steps I took to set up this lightweight tool so you can learn how to do it yourself as well!
Setting up n8n with Docker on Windows
My first step here was to set up an n8n automation workflow tool using Docker on a Windows machine. We’ll use docker-compose to simplify the process of defining and running our container.
- Open up Command Prompt
- Made a Docker folder in C:\Users\Simone
- mkdir C:\Users\Simone\n8n-docker
- Then change directories into that folder
- cd C:\Users\Simone\n8n-docker
It’s best practice to keep your Docker configurations organized in dedicated folders. This n8n-docker directory will house your docker-compose.yml file and any related configuration files for n8n.
Create the docker-compose.yml File
- While in Command Prompt, create a docket-compose.yml file in the folder
- notepad docker-compose.yml
The docker-compose.yml file defines how Docker should run the n8n container — specifying the image, ports, volumes, and other container settings. Using notepad here is a quick way to create and edit the file on Windows.
- Pasted the n8n image into the file
You can get the n8n image from ____. Simply copy and paste this into the file. This configuration pulls the official n8n image from Docker Hub. It will map a local volume for persistent data so workflows aren’t lost when containers stop. Also, don’t forget to choose a secure password here.
- While in the folder, downloded the n8n image by runnning
- docker-compose up -d
- This is exposed at http://localhost:5678
- Starts the container
This command reads the docker-compose.yml file, downloads the n8n Docker image (if not already cached), and starts the container in a “detached” mode – hence the “-d” – so it runs in the background.
- Open up a web browser
- Go to URL http://localhost:5678
- I signed into the Docker n8n container on the web browser
This is where the n8n workflow interface is hosted. The 5678 port was mapped in your docker-compose.yml, allowing your local browser to communicate with the running container.
Sign in to n8n using the username admin and the password you set in your docker-compose.yml. Authentication was enabled for security, especially important if you plan to expose this service beyond localhost.
Now you’ve successfully installed n8n inside a Docker container on your Windows machine using Docker Desktop.
That means:
- You’re now running n8n as a containerized service, isolated from your main system
- It’s hosted locally at
http://localhost:5678 - Any workflows, credentials, and settings you create are stored in the mounted volume (which is “
./n8n_data“), so they persist even if the container restarts

Create a Webhook Trigger in n8n
In this section, we’ll walk through how to create a Webhook Trigger in n8n. But first…
What is a Webhook?
Because I had no idea what this was until I got into n8n.
A webhook is a way for external systems to send data into your workflow. In n8n, a webhook node waits for incoming data at a specific URL. Unlike APIs, which require polling, webhooks push data automatically when triggered.
You can use this in 3 main ways:
- From a form submission (like uploading a risk or document)
- From another app (like Google Drive when a file is added)
- From your own frontend (like something you can design with React)
In n8n, a webhook node listens at a URL like: http://localhost:5678/webhook/<method>/<path>
So let’s get back to it.
- Logged into n8n’s web UI at http://localhost:5678
- Used the credentials I defined in my docker-compose.yml
- Created new workflow titled “GRC AI Tool”
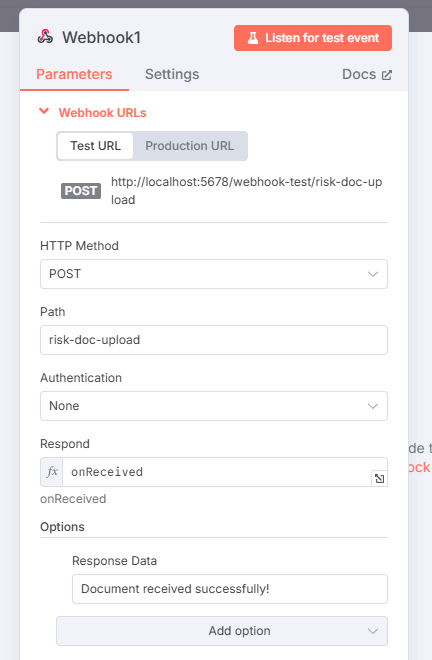
- Added a Webhook node and configured it like so:
- Set the HTTP method to “POST”
POST allows external tools or frontend apps to send data in the body of the request
- Set the Path to “risk-input“
We’re using a “POST" method to allow submission of structured data (like JSON). The path “risk-input” is just what I decided to name it, but you could name it anything you’d like. Having a descriptive path name can lend insight towhat the webhook is designed to do. In this case it is to accept manual risk entries, not automated alerts.
The manual risk input webhook is designed to allow users to submit freeform risk statements — situations where they know the risk already and want to document it.
These could be observations like:
- “Users are sharing passwords over email.”
- “They don’t have 2FA enabled for vendor portals.”
- “Third-party logs are stored unencrypted.”
These observations are just one way you could input risk into an AI agent. For example, another tool could include parsing a file instead of manually inputting the statements yourself.
Now let’s test out if our webhook node is working.
Simulate Risk Input with a Test Tool
We’ll test the webhook by simulating a POST request using an online tool.
- Open a web browser
- Go to https://reqbin.com
This free tool lets you make custom HTTP requests directly in your browser.
- Set up the Method to be “POST” (just like what we set in n8n)
- Set URL to the n8n webhook
- Set Body as JSON

- Get the Chrome extension for ReqBin

- Send the HTTP POST request
- Go back to n8n
- Click “Execute Workflow” to start listening for the request
- After sending, you should see the data arrive in n8n under the Webhook node’s output

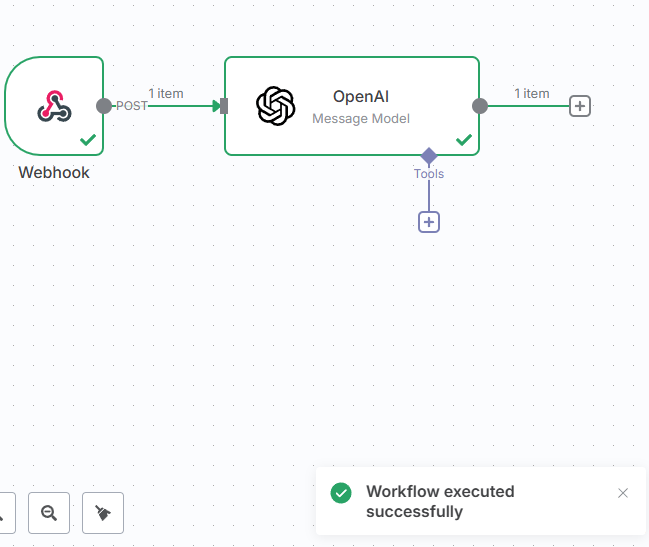
Add OpenAI Node
After receiving a risk statement via webhook, the next step is to summarize the input using OpenAI’s GPT-4 model. This will make the statement more standardized for reporting purposes.
So now we’ll need to connect n8n to OpenAI.
- In n8n, after the webhook node, add another node called OpenAI
- Select ” Message a Model” to lsend a prompts directly to GPT-4
The “Message a Model” operation allows you to interact directly with GPT-4 using custom prompts. You control the input and can fine-tune how the model responds.
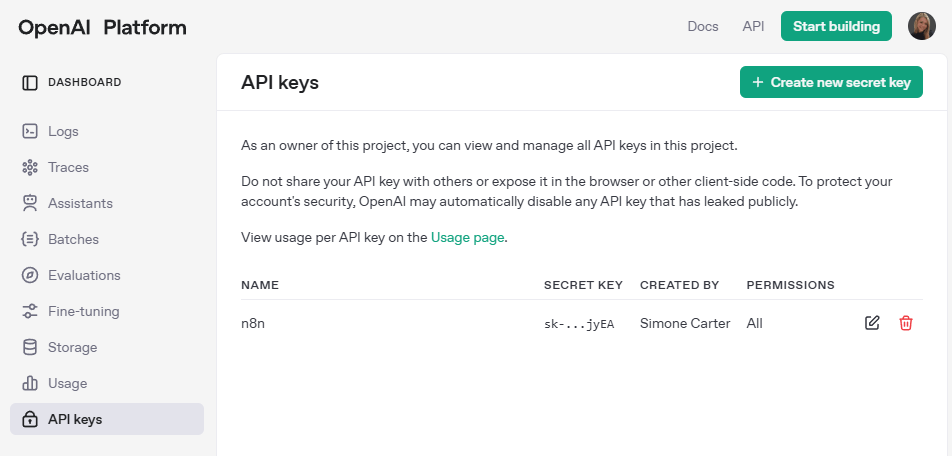
In order to connect, we will need an API key from OpenAI.
- Open a web browser
- Go to OpenAI Platform
- Sign into Open AI
- Navigate to Libraries > Dashboard > API Keys
- Create a new secret key here
- Copy the secret key
- Go back to n8n
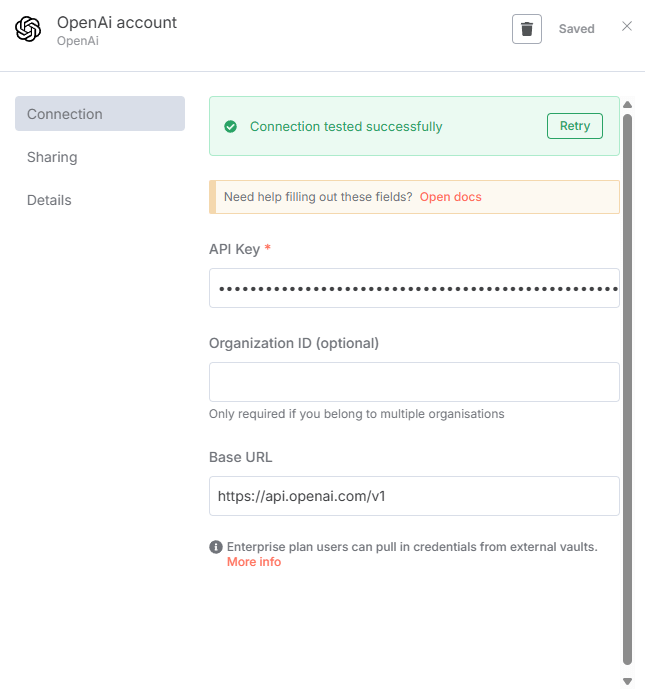
- Paste the secret key into the OpenAI API key field in n8n
This step authenticates n8n to send API requests to OpenAI. Once connected, you can start sending your webhook-submitted risk statements to GPT-4 for summarization.
Now that the OpenAI node is added and authenticated, we’ll fine-tune how it interacts with the GPT model by specifying model type, message role, and prompt content.
- In the OpenAI node, find the dropdown for Model
- Chose GPT-4 (or whichever model you prefer)
I chose GPT-4 because it is OpenAI’s most advanced model (as of this writing). It provides more accurate, fluent, and nuanced outputs than GPT-3.5.
- Set message Role to “User”
In OpenAI’s chat-based API, roles help the model understand who is speaking and from what context. The "User" role is typically used for prompts (the content you’re instructing the model to respond to).
You could also select “System” to define the model’s behavior. For example, telling the model “You are a GRC analyst assistant” and then continue to piece together other roles for more advanced setups.
- Input for the Message Content:
Summarize the following risk for audit documentation: {{$json[“risk”]}}
This prompt gives GPT-4 a clear instruction: take the risk text submitted from the webhook ({{$json["risk"]}}) and generate a more formal version suitable for reports or audits.
{{$json["risk"]}} is a dynamic reference in n8n that pulls the risk value from the previous Webhook node’s JSON payload.
Based on this, this input would look something like:
“risk”: “users are sharing passwords over email”
And then, the output might look something like:
“Passwords are being transmitted via unsecured email, creating a potential data breach risk.”
Now we can test the workflow that we have so far. Let’s go back to the tool we were using before.
- Return to https://reqbin.com
- Send POST request to the same webhook as before to test the URL
- Include the JSON body
- Go to n8n
- Click Execute Workflow
- Make sure the webhook receives the data, sends it to the OpenAI node, and the OpenAI node produces an output
So, great news! We have output! But where can we go to look at it? That’s where Supabase comes in.
Saving Output in Supabase
What is Supabase?
Supabase is an open-source backend-as-a-service (BaaS) that lets you quickly spin up a PostgreSQL database along with authentication, storage, and APIs.
It’s a great resource for testing tools like we’re doing here.
Now, are you also wondering what PostgreSQL is?
What is PostgreSQL?
PostgreSQL (or Postgres) is a powerful, open-source relational database system. It supports advanced SQL queries and is known for being developer-friendly.
Supabase uses PostgreSQL as its core — which means anything you can do in Postgres, you can do in Supabase (with added convenience).
What I’ve done for Supabase is run it locally in Docker to test my tool. That way I don’t have to rely on cloud resources.
Let’s first visit the Supabase Dashboard
- Go to https://app.supabase.com
- Log in or sign up to link your GitHub account here if you’d like
The Supabase cloud dashboard will let you deploy hosted projects, but if you want to clone the Docker template repository, you’ll need to use a GitHub login.
- Open Command Prompt
- Create a project folder for Supabase
- mkdir supabase-local
- cd supabase-local
This folder will contain your local Supabase configuration, including Docker setup. Keeping it isolated makes it easier to manage.
- Cloned Supabase’s official Docker template
Supabase provides an official Docker configuration to run all of its services (Postgres, API gateway, Auth, etc.) locally. This means you can run the entire Supabase stack on your machine using Docker Compose. Again, no cloud setup needed.

After cloning the Supabase Docker repo and launching the containers, the next step is to configure environment variables and set up your database schema using Supabase Studio, the UI.
- Open Command Prompt
- Create an .env file in supabase/docker folder
- cd supabase/docker
- notepad .env
This file defines environment variables for your Docker-based Supabase stack. It controls settings like PostgreSQL passwords. If you don’t customize this, the stack will run on default ports. But setting values manually can avoid conflicts and help you connect external tools securely.
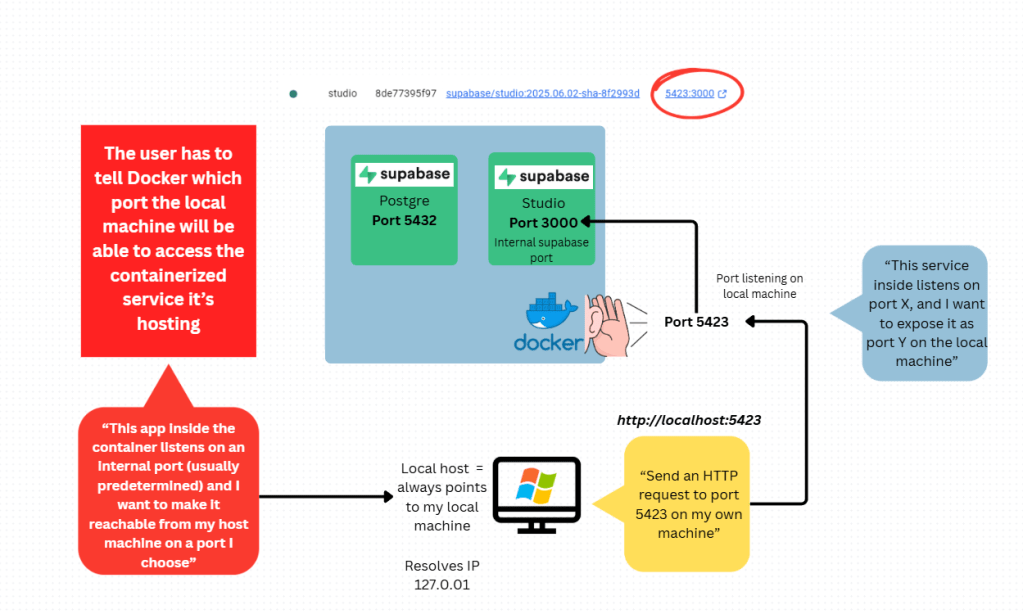
- Access Supabase Studio locally by going to http://localhost:5423
Supabase’s official Docker template shares that the Studio UI is typically exposed on port 5423. Again, you can always change this by adjusting the.env or docker-compose.yml.
Now let’s create the table where our outputs will live.
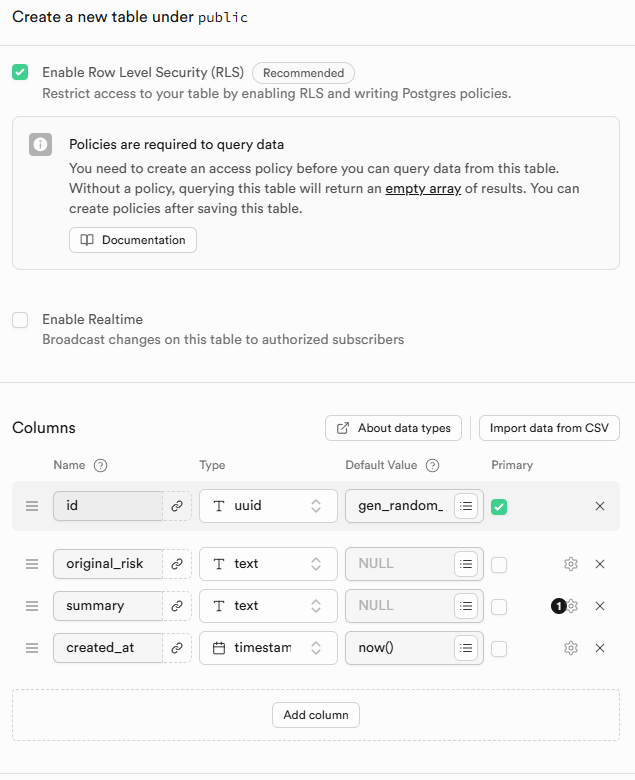
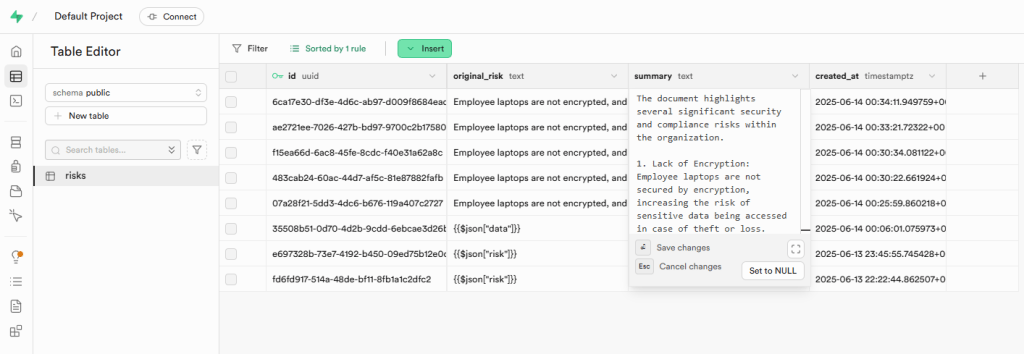
- Within Supabase Studio UI, create a new table
- Name it “risks”
- Set id to UUID
UUID = Unique identifier. Using gen_random_uuid() for the id field under “Default Value” will auto-generate UUIDs for each row.
- original_risk – Text – Required
Raw risk input from the user via the webhook.
- Summary – Text – Optional
Summarized version (the output of the ChatGPT node).
- Created_at – Timestamp with time zone – Default
Setting the default to now tracks when each input was submitted.
Connected Supabase to n8n
Once both n8n and Supabase are running in separate Docker setups, they live in different Docker networks by default. To allow n8n to talk directly to Supabase’s PostgreSQL container (instead of using localhost, which won’t work across networks), you need to connect the containers together manually.
- Open Command Prompt
- docker network connect supabase_default n8n-docker-n8n-1
supabase_default = the Docker network that was automatically created when we ran Supabase’s docker-compose stack.
n8n-docker-n8n-1 = the name of the n8n container. You can also double check this with docker ps
Therefore, this command adds the n8n container to the Supabase network so it can resolve Supabase services by container name (Ex: “supabase-db“).
Now let’s restart the n8n container.
- docker restart n8n-docker-n8n-1
Restarting forces n8n to re-reads its network configuration. That way it will become aware of the new connection to supabase_default.
- Go back to the workflow we created in n8n
- Add a new node
- Select “PostgreSQL”
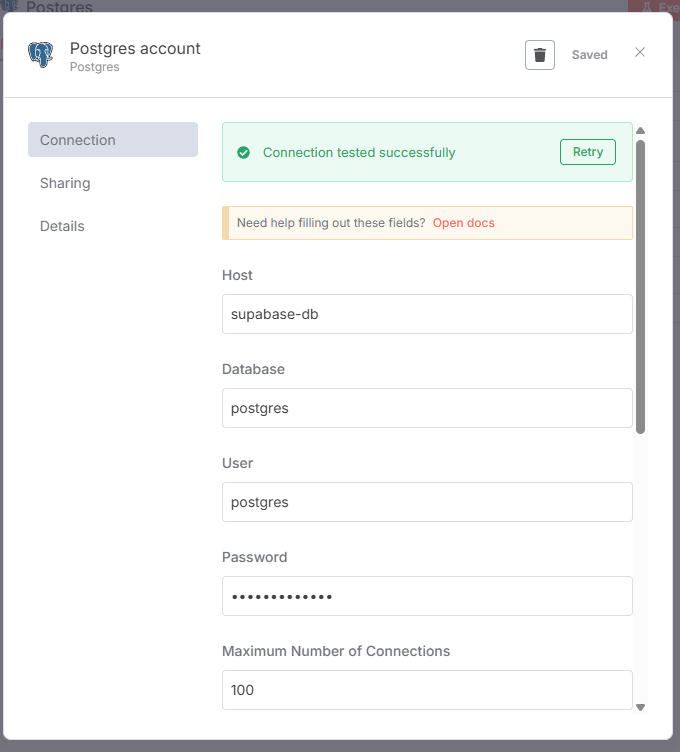
Once the n8n container is connected to the Supabase Docker network and the PostgreSQL credentials are set up, we’ll need to makes sure we can insert data directly into the risks table without writing raw SQL.
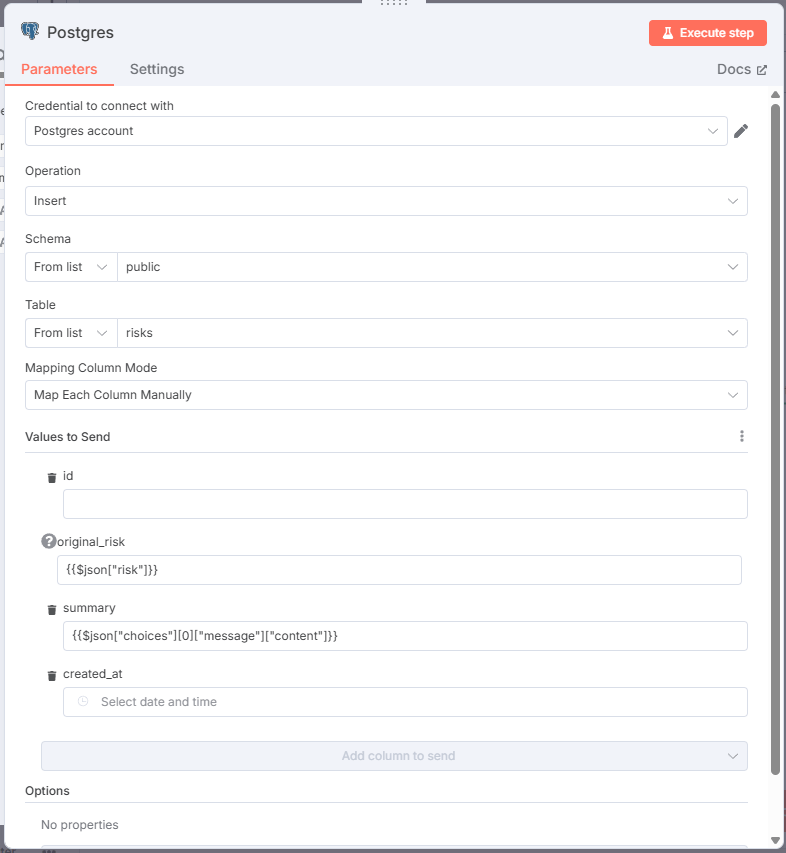
- Continued configuring the Postgres node by setting
- Operation: Insert
This tells n8n that you’re performing a record insertion into a database table.
- From list: public
By default, Supabase uses the public schema for all user-defined tables unless you wanted to create a custom schema. The risks table will be inside public.
- From list: risks
This is the name of the table we created earlier in Supabase to store manually submitted risk data.
- Original risk: {{$json[“risk”]}}
This pulls the raw user-submitted risk statement directly from the Webhook node’s output JSON.
- Summary: {{$json[“choices”][0][“message”][“content”]}}
The OpenAI node gives back a full response in a format called JSON which is basically organized data with labels. Inside that response is the summary written by the AI. The expression {{$json["choices"][0]["message"]["content"]}} goes into that response and pulls out just the text of the summary.
Creating React UI
Now we’ve gotten to the point where we can create a frontend UI!
I decided to go with a React-based web interface, and I wanted to take the project a step further. Now I want t create a workflow that will include parsing, so that users could upload .txt, .pdf, or .docx files. These files will be sent to the n8n workflow via a webhook, where the contents are parsed and summarized using OpenAI. The summary is then displayed back to the user.
This kind of setup is useful for automating the intake of risk reports, audit findings, or compliance issues in document form.
First, I had to install Vidual Studio Code (VS Code).
- Downloaded VS Code from https://code.visualstudio.com
This will be the code editor you’ll use to write and manage your React frontend.
I also read online that Vite is a fast build tool and dev server for modern frontends, making development smoother than older tools like Create React App. So the next thing I did was created the project with Vite
- Open the VS Code terminal
- npm create vite@latest
- cd grc-ui
- npm install
- npm run dev
- Opened the grc-ui folder in VS Code
I’ve had experiences “vibe coding” before and I know when ChatGPT gives you code for the first time it is likely to work. But any changes? You better know how to code yourself or you risk digging yourself into a deeper and deeper hole.
- Removed the boiletplate App.jsx and inserted code from ChatGPT
- Opened a terminal
- npm run dev
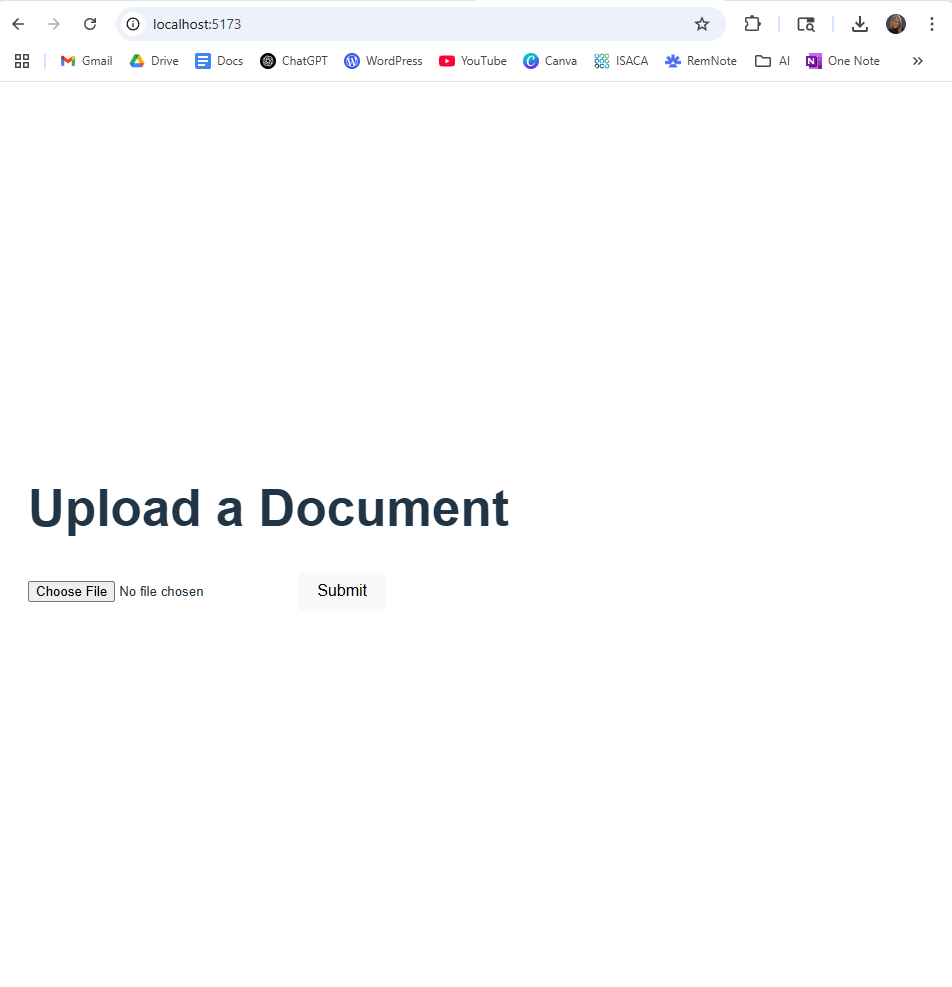
Not the prettiest thing. But it’ll do for now.
Let’s return to n8n and create an updated work flow that can handle parsing.
Created a separate workflow in n8n for Document Upload
- Created the webhook
- Copied the URL for the webhook to the React app

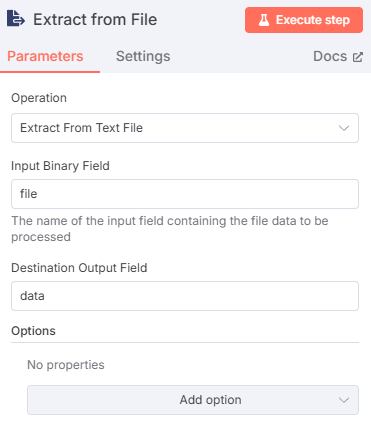
- Created an additional node in n8n for extracting TXT (binary) to JSON
- Configured the OpenAI message model node with a new prompt
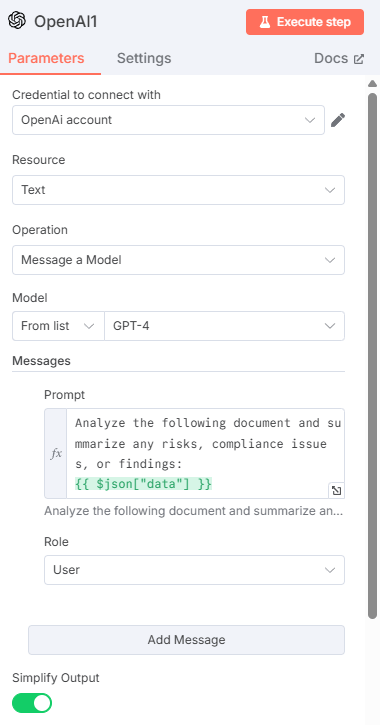
- Updated Postgres node to use {{ $node[“Extract from File”].json[“data”] }}
- Tested with a file upload > success
- Went to http://localhost:5423/ > Database > Tables > risks

And this is how far I’ve gotten.
I have been working on several other projects so I haven’t been able to return to this as soon as I’d like. But I think it was a great intoduction to n8n. It definitely got my juices flowing… so more to come soon!
